
The push-up is the perfect demonstration of how often-overlooked qualities such as mobility, co-ordination and control come together to produce genuine strength.
We don’t get stronger by simply building muscle; muscle alone is nearly useless. Physical strength is a byproduct of proper technique, and developing proper technique takes patience and practice.
That’s what this series is all about – patience and practice.
Is VO2 max the best predictor of lifespan? I took the fitness test to find out
Today, we’re breaking down the full push-up, followed by four modifications that will allow you to adjust the exercise to your current abilities. Then, over the next three weeks, you’ll learn how to address weaknesses that tend to stall progress – specifically in the hands and wrists, the core, and the shoulders and scapulae.
The method:
The beauty of this system is that it never expires. After you nail your first full push-up, you don’t throw this blueprint away; you use these exact same modifications to build high-quality endurance.
As you get stronger, you simply strip away the tools you’ve outgrown. You might drop the kneeling version and focus instead on slowly lowering to the bottom. From there, maybe you use your knees to get back up, or maybe you don’t. You can thread these tactics together to accumulate a solid block of three to five pristine reps, and build from there.
Over the next seven days, find your personal baseline. Test the full push-up. If your technique cracks, pivot to the modification that allows you to move with total control and easy breathing. Practise your chosen variation for just a few minutes every day. Set a timer for 30-60 seconds and get to work, taking breaks whenever needed. Two or three sets will do. We aren’t counting reps yet – we are building the skill of tension.
When you test your baseline, pay close attention to where your technique wavers. You’ll probably notice right away that your wrists ache, your shoulders pinch, or your midsection sags the moment you unlock your elbows. To build a flawless push-up, we have to address these hidden bottlenecks, which is exactly what we will do over the next three weeks.
The movement: push-up
The push-up pulls double duty as a strength-building exercise and a diagnostic tool. Depending on the lens you’re looking through, a single repetition tells a story about your entire body. It provides an instant snapshot of your upper-body power, core endurance and co-ordination, but it also highlights hidden weak spots, revealing everything from shoulder and wrist limitations to issues with hip alignment and ankle mobility.
How to do it: Start in a high plank position with your hands just outside your shoulders and your eyes on the floor. Squeeze your glutes and thighs together, pull your shoulder blades down your back, and brace your abs as if you’re about to deflect a blow to the belly. Once your body is fully engaged, lower your chest toward your thumbs, keeping your elbows tucked back. Stop when your upper arms line up with your ribs, then push the floor away as hard as you can to return to the top.
Key take-aways: A push-up is a plank in motion. Your entire body, from your heels to your head, must move together as one cohesive unit. Be mindful of your hips and ribs – don’t let them sag, shift or lift. Don’t flare your elbows out to the sides. Keeping your upper arms angled backward protects your shoulder joints and forces your triceps to take on their share of the work.
The modifications:
Kneeling push-up
This is our universal starting point. Push-up pros and absolute beginners all begin in this position – the difference is that beginners will stay here to build their baseline, while the experienced use it as the setup for the full movement. We’re taking advantage of this stable position to focus on posture and joint alignment.
How to do it: Everything here is the same as the standard push-up, only your knees are on the floor. You’re activating all the same areas – the glutes, the shoulder blades, the core. Maintain a straight line from your head to your knees as you lower your chest toward your thumbs, then press back up, locking out your arms at the top.
Key take-aways: Range of motion is not the priority here. Quarter-reps or half-reps are fine. Smooth, composed execution is what matters most. As you get stronger, the range of motion will naturally increase.
Incline push-up
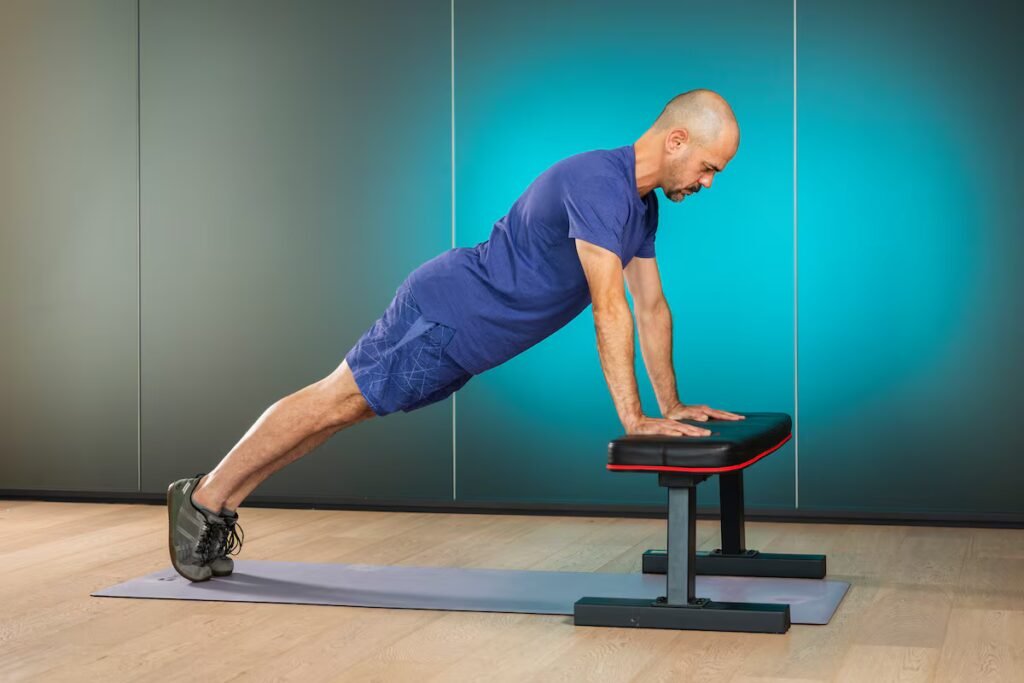
If the kneeling push-up is Option 1, consider this Option 1b. For a lot of people, getting onto the floor just isn’t possible – whether due to cranky knees, wrist limitations, or the sheer strength required to move your body weight that close to the ground. The incline push-up removes all those obstacles, making the exercise accessible to just about everyone.
How to do it: Place your hands on an elevated surface like a sturdy bench, a kitchen countertop, or a secured barbell in a squat rack. The higher the surface, the lighter the load on your upper body. All of the same activation and alignment cues apply. And as with the kneeling push-up, don’t worry about how deep you lower your body. Work within the range of motion that’s right for you.
Key take-aways: You don’t adjust your body to suit the exercise; you adjust the exercise to suit your body. If the floor feels overwhelming, elevate your hands until you find a position where you can remain calm and in control. That will make it much easier to focus on the essential aspects of the exercise, namely your posture and alignment.
Eccentric push-up
While the kneeling and incline variations help us map out proper technique without the burden of too much resistance, the eccentric – or negative – push-up flips the script. Here, we introduce the full weight of your body but remove the hardest part of the movement: the pushing. This allows you to build the baseline strength and structural tension required for a full floor repetition.
How to do it: From the top of a full push-up, lower your body all the way down to the floor while maintaining a strong plank posture. You don’t need to move in super slow motion, but you must actively resist gravity’s pull on the way down. Aim for a controlled one-to-two-second descent. Once your chest touches the floor, relax, reset and get back up to the top position however you can.
Key take-aways: This variation isolates the lowering phase to expose your muscles and joints to a full body-weight load. If you drop like a brick the second your elbows unlock, or if your ribs flare out as you descend, return to the incline or kneeling positions until you can control the descent with grace.
Eccentric-to-kneeling push-up
Here we combine the two previous modifications to create the ultimate intermediate bridge. Once you have developed the confidence, technical know-how and control from the previous exercises, you can begin to thread the lowering and pushing phases together under a much higher load.
How to do it: Perform an eccentric push-up exactly as described above, lowering your body to the floor with total control. The moment you reach the depth where you feel you are just about to lose your composure, or once your chest is at your thumbs, place your knees on the floor. From here, push the floor away to return to the top. Reset into the top position and repeat.
Key take-aways: Quality and body awareness matter far more than depth. Pay close attention to your personal threshold; dropping your knees the second your technique starts to crack ensures every single rep remains clean, safe, and productive.


More Stories
More reasons to ditch ultraprocessed foods
Your daily horoscope: October 12, 2026
Roblox side hustle helped this 25-year-old buy a five-bedroom home in Windsor